Copyright © My Little Corner of the World
Design by Dzignine
Friday, December 15, 2023

Welcome Back

Welcome Back! (dolaosin geoseul hwanyeonghamnida)

It's been an interesting couple of years.  I haven't posted in 5 years and my fist post back isn't even about crafting. Between life and the pandemic I stopped creating, I stopped posting, I stopped trying. I feel like the pandemic took a toll on EVERYONE; we all lost someone or something. 

I've waivered on whether to delete my blog or keep it going. Ultimately I figured if nothing else it's a great way to look back at how my life has changed.

For those of you who may actually read this, how did you make it through the pandemic? Are you doing okay? I hope you are. I hope you've healed and are moving forward. If you aren't that's okay, just keep trying everyday. Any amount of progress is progress. Do what brings you joy!

What makes you happy these days? Me? I have recently found joy in Korean Dramas (or K-Dramas) and K-Pop.

I first dipped my toes into the K-Drama world back in 2018 when I watched *Strong Girl Bong-soon with my sister. While it took me a bit to dip my toe in again, I am delighted that I did.


Though similar to Telenovelas Soap Operas, Korean Dramas are in a class all their own. Unlike Soap Operas, Korean Dramas rarely have as many episodes with most seasons/series capping out at 13-20 episodes. And while some Soap Operas may span multiple seasons/series, more often then not Korean Dramas finish after one season. I like to call them one and done! The upside to this, you don't get bogged down on one series for years. The downside to this is sometimes you miss those characters and want to see where the story would have taken them.


While I am still new to watching K-Dramas compared to others, I have yet to find a series that I didn't love. If I do I will let you know! 😂


K-Dramas have everything, actions, drama, comedy, romance, and sometimes even social commentary. Every time I finish a K-Drama I feel like I have been on an adventure. It's like reading a good book and being immersed in that world. Am I the only one who screams when the main love interest get together? I know it's coming but I still gleefully shriek, much to the dismay of anyone within earshot. 

I used to feel guilty for watching and getting so wrapped up in the stories, but post pandemic me doesn't care. K-Dramas bring me joy and from time to time help me heal. I'm going to keep watching them and sharing my thoughts with anyone who may happen across my little blog. 

img src: {Pixels}

* As of the publishing of this post, Strong Girl Bong-soon was not available to stream. It's successor Strong Girl Nam-Soon can be streamed on Netflix.  I am working on my reviews for both series, but until they are posted let me just say Byeon Woo-seok is reason enough to watch this series.  


Wednesday, August 29, 2018

Shake It Up: Designer Creative Challenge

Hey there, welcome to my little corner of the world! I'm here today to share a card I made for Craftin Desert Divas Shake It Up Designer Creative Challenge.


I have to tell you, this challenge was kismet! I bought the Bright Horizons Stencil because the moment I saw it a card idea popped into my head. Ever have that happen? My hubby hates it, because it usually means I'm buying more crafting supplies. Anyways, I saw this stencil and I had an idea kicking around in my head, sketched it out, but didn't actually get around to making it. This poor stencil sat around just waiting to be used. Then this designer creative challenge came up and I knew that it would only take a small change to make my card into a shaker.

I started by cutting my card base from some Strathmore Bristol Smooth. I next cut out a panel that was about 1/8" of an inch smaller than the largest die in the Inside Scalloped Rectangle Dies and set it aside. Next I pulled out some patterned paper from my stash and traced the sun portion of the stencil from some bright yellow patterned paper that has cute little polka dots and cut out all the pieces. I did the same thing with the clouds, only I used a blue patterned paper that featured white stripes. The patterned paper that I picked had a sheet with these cute little hearts, so I cut a couple out just in case.

I then aligned my stencil on the smaller piece of Bristol Smooth and used it as a guide to glue down the sun and clouds. I then cut out the largest scalloped frame from the Inside Scalloped Rectangle Dies and glued a piece of acetate to the back of it. I doubled up some 3M foam on the back of the scalloped rectangle die and set it aside. Since the shaker portion is so big I wanted to make sure that even when not being shake you could see the some of the sequins. I accomplished this by just gluing some Mermaid Lagoon Sequins to various parts of my paper pieced sun and clouds. I then glued one of those hearts I had cut out and put a fair amount of sequins in the middle of my sheet so I could attach the front part of the shaker.I added everything to my card base, added my sentiment and Voilà!


Supplies
Paper: Strathmore Bristol Smooth, Scrapbook Paper
Ink: Versafine Onyx Black
Accessories: Bright Horizons StencilInside Scalloped Rectangle DiesMermaid Lagoon Sequins, Ranger Multi Medium Matte Adhesive

Until next time, keep on crafting!


Thursday, August 23, 2018

Obsessed with Distress Oxides

Hello Divas! Welcome to my little corner of the world. I'm here today participating in Craftin Desert Divas Obsessed with Distress Oxides Designer Creative Challenge.

I'm sure I can't be the only one who is utterly OBSESSED with Distress Oxide Inks? I mean seriously they go on so easily, especially if you're using watercolor paper or bristol smooth paper. I love how they react to water and recently I've enjoyed the look of Dr. Ph. Martin's Iridescent Silver sprinkled over the top.

For today's project I decided to use my favorite color combo for Distress Oxide Inks Antique Linen, Tattered Rose, and Worn Lipstick; I feel it looks like a romantic sunset.


I pulled out some Strathmore Bristol Smooth cut to 4" x 5.25" and started by blending Antique Linen on the bottom third of the panel (vertically). I next started blending tattered rose on the next third of the panel, taking care to blend between the Antique Linen and Tattered Rose, and then moved on to blending some Worn Lipstick on the top portion of my panel. I splattered my beloved Dr. Ph. Martin's Iridescent Silver and set my panel aside to dry. I pulled out my Puffy Cloud Die and cut a few out for the background and then colored the My Tweetheart Digi Stamp and accented with some white gel pen.

I mounted my panel onto a card base made of Neenah Solar White 110lb. paper. I glued down my clouds and added some of Craftin Desert Divas Sweetness Sequins mix. I finished off my card by popping my image onto an action wobble, using some Wink of Stella on my clouds, and adding my punny sentiment.


Supplies:
StampsMy Tweetheart Digi Stamp
Paper: Strathmore Bristol Smooth, Neenah Soloar White 110lb.,
Ink: Distress Oxide Ink: Antique Linen, Tattered Rose, Worn Lipstick
Accessories: Puffy Cloud Die, Sweetness Sequins, Wink of Stella


I love how this card turned out and it was so much fun to make! It's your turn now, go forth and play with Distress Oxides. If you're already a fan leave a comment with your favorite color combo!

Until next time, keep on crafting!

Friday, August 17, 2018

August New Release Hop

Hey Divas welcome to my little corner of the world! Today I am participating in Day One of Craftin Desert Divas Designing August New Release Two Day Blog Hop.

This is such an exciting time! I've had the pleasure of seeing what all the lovely Divas on the Digi Design Team have been working on and I'm excited for you all to see what they have in store. Before I continue I am just going to tell you now that you are going to want ALL of the Digi Stamps in this month's release. You want to know how I know this? Because I had to have them all as well. I can't wait to play with all of them soon.

Since you're here I thought I would share a couple of my creations using the Tribal Bear and Tribal Lion in this month's Digi Release.

For my first card I am using Craftin Desert Divas Tribal Bear Digi Stamp and images from their Outdoor Camping Digi Stamp Set.


I was inspired by this painting I found in a Pinterest search. I thought this would make a great backdrop to an "outdoorsy" card.

{Photo Credit: Noelle Lewis}


I started by using some Strathmore Bristol Smooth cardstock cut down to 4" x 5.25". Next I pulled out my Distress Oxide Inks and starting at the bottom I sponged on some Evergreen Bough, then blended in my next color Faded Jeans, and finished it by adding Black Soot at the top of the panel and down some of the edges. I added "stars" by splattering some white gouache paint and some Dr. Ph. Martin's Iridescent Silver.  While my back panel was drying, I pulled out my Cricut and cut out my little tent and trees from a free file I found online and stuck that sucker on my card panel. I colored in the flashlight, sleeping bag, log, and binoculars from the Outdoor Camping set and the Tribal Bear and added them to my card. In hindsight if I had it to do over again, I would have cut out the tent from the Outdoor Camping set, other than that I am so pleased with the way this came out.


Supplies
Stamps: Craftin Desert Divas: Tribal Bear Digi Stamp, Outdoor Stamping Set
Paper: Strathmore Bristol Smooth, Black Cardstock, Neenah Classic Crest 100 lb.
Inks: Spectrum Noir and Distress Oxide Inks in Evergreen Bough, Faded Jeans, and Black Soot
Accessories: Dr. Ph. Martin's Iridescent Silver, White Gouache

For my next card I used the Tribal Lion Digi Stamp Set.

Tribal Lion Digi Stamp Set

I fell in love with and wanted to use some Doodlebug Milk and Cookies patterned paper. I thought it had a "woodsy" feel and knew it would work great with the Tribal Lion. So I started by cutting a sheet of 8.5"x11" brown cardstock in half vertically so I could make a 4.25" x 5.5" top folding card base. I cut my Doodlebug paper to 4" x 5.25" so some of the card base would still show. Next I cut a piece of kraft cardstock to 3.5" x 4.75" and ran it through my Cuttlebug using Darice's Woodgrain Embossing Folder. I then went over the embossed image with some Distress Oxide Ink in Evergreen Bough. I moved onto coloring this super cute Tribal Lion Digi Stamp, along with a couple of the marshmallow on a stick, and a lantern from the Outdoor Camping Digi Stamp Set. I glued my patterned paper to my card base and then used 3M Foam Tape to pop up the woodgrain background. I cut a strip of my patterned paper 3.5" x 1" and glued it down with the alternate pattern facing up to ground my lion. I glued my digi images down and finished it off with some Wink of Stella and a white gel pen. Unfortunately this picture does not do the card justice. I loved the way it turned out!


Supplies
Stamps: Craftin Desert Divas: Tribal Lion and Outdoor Camping Digi Stamps, Sentiment is from Hero Arts
Paper: Brown Cardstock, Kraft Cardstock, Doodlebug Cookies and Milk Patterened Paper
Inks: Distress Oxide Ink in Evergreen Bough
Accessories: Wink of Stella and White Gel Pen

Don't forget to check out what's going on at the Craftin Desert Divas Blog and check out my other fellow Design Team Diva's works of art! I mean seriously these ladies did such a great job I am so excited for you to see. Next on the Hop is:


Don't forget if you're like me and want all the Digis then you may want to sign up for Craftin Desert Divas Digi Stamp Club, which includes: Monthly $14 coupon code, Digital stamping tutorials, Digital Inspiration, Coloring tips for digital stamping!

Alright Divas, that wraps things up for me today. Until next time, keep on crating!

Thursday, July 26, 2018

Designing with SVGs

Hey guys welcome to my little corner of the world! Today I am participating in Craftin Desert Divas Designing with Dies/SVGs Designer Creative Challenge.


I don't know about you, but I love me some Dies and SVGs! Today I am going to chat a little about SVGs, why I love them, and share my project using Craftin Desert divas Trat Bag Add Ons: Hippty Hoppity and Birthday Critters.

What are SVGs? SVGs or Scalable Vector Graphics are an XML-based vector image format for two-dimensional graphics with support for interactivity. When it comes to crafting this interactivity means it is turned into a cut file for use with machines like the Cricut Explore, which is what I own. My understanding is that SVGs can be used with other machines such as the Silhouette. There are several companies out there that offer SVGs for sale that can be imported to your machine, I got mine from Craftin Desert Divas.

While these files were meant as an add on to the Treat Bag Dies, it doesn't mean you can't use them for other purposes.

I saw these cuties and knew I wanted to make some mini note cards that I could pop in with a gift or into a loved one's lunch so I downloaded my files from Craftin Desert Divas and imported them into my Cricut.

I started a new projected and clicked on the upload icon to the left of my canvas.

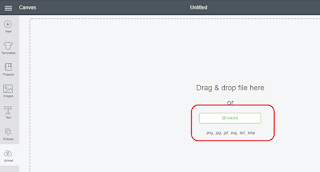
This will take you to the next screen where you can upload your image or file.

And this takes you to yet another page where you can browse your computer or tablet for the file you will be uploading. 

The SVGs from Craftin Desert Divas all come in one easy to upload file. So all of the Hippity Hoppity critters are in one file and all of the Birthday Critters are in one file which is uploaded to your device.

I haven't made all the Critters into cards yet, I just started with my favorites. I opted to  leave off the birthday hats as I wanted to these to be all occasion, just because mini cards.

I added both sets to my canvas and then chose which Critters I wanted to cut out and sent them to my Cricut Mat. From there it was all about inking the edges, gluing my pieces together, and finishing them off with some patterned paper, white gel pen, and Wink of Stella!

For my Panda card I cut the image out of Neenah Classic Crest 80lb cardstock and black cardstock. I glued my images together with Ranger Matte Mutli Medium. I accented the Panda with a white gel pen some Wink of Stella, and did some light shading with Antique Linen Distress Oxide Ink. I made a 3.5" top folding note card and added some Doodlebug Cookies and Milk paper before adding the Panda with some 3M foam tape. 


For my Fox card I cut the image out of Neenah Classic Crest 80lb cardstock and some old rust cardstock from Stampin' Up!. I glued my images together with Ranger Matte Mutli Medium. I accented the Fox with a white gel pen some Wink of Stella, and did some light shading with Antique Linen Distress Oxide Ink. I made a 3.5" top folding note card and added some Doodlebug Cookies and Milk paper before adding the Panda with some 3M foam tape.


For my Bunny card I cut the image out of Neenah Classic Crest 80lb cardstock, black cardstock,  and some pink cardstock. I glued my images together with Ranger Matte Mutli Medium. I accented the Panda with a white gel pen some Wink of Stella, and did some light shading with Worn Lipstick Distress Oxide Ink. I made a 3.5" top folding note card and added some Doodlebug Cookies and Milk paper before adding the Panda with some 3M foam tape. 


If you have any questions about how I made these or about the SVGs feel free to comment below. Now it's your turn, go forth and make some adorable creations with these critters. Thanks for stopping by, until next time keep on crafting!