I don't know about you, but I love me some Dies and SVGs! Today I am going to chat a little about SVGs, why I love them, and share my project using Craftin Desert divas Trat Bag Add Ons: Hippty Hoppity and Birthday Critters.
What are SVGs? SVGs or Scalable Vector Graphics are an XML-based vector image format for two-dimensional graphics with support for interactivity. When it comes to crafting this interactivity means it is turned into a cut file for use with machines like the Cricut Explore, which is what I own. My understanding is that SVGs can be used with other machines such as the Silhouette. There are several companies out there that offer SVGs for sale that can be imported to your machine, I got mine from Craftin Desert Divas.
While these files were meant as an add on to the Treat Bag Dies, it doesn't mean you can't use them for other purposes.
I saw these cuties and knew I wanted to make some mini note cards that I could pop in with a gift or into a loved one's lunch so I downloaded my files from Craftin Desert Divas and imported them into my Cricut.
I started a new projected and clicked on the upload icon to the left of my canvas.
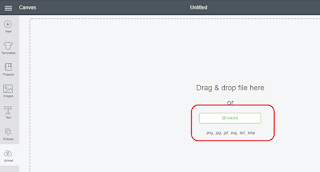
This will take you to the next screen where you can upload your image or file.
And this takes you to yet another page where you can browse your computer or tablet for the file you will be uploading.
The SVGs from Craftin Desert Divas all come in one easy to upload file. So all of the Hippity Hoppity critters are in one file and all of the Birthday Critters are in one file which is uploaded to your device.
I haven't made all the Critters into cards yet, I just started with my favorites. I opted to leave off the birthday hats as I wanted to these to be all occasion, just because mini cards.
I added both sets to my canvas and then chose which Critters I wanted to cut out and sent them to my Cricut Mat. From there it was all about inking the edges, gluing my pieces together, and finishing them off with some patterned paper, white gel pen, and Wink of Stella!
For my Panda card I cut the image out of Neenah Classic Crest 80lb cardstock and black cardstock. I glued my images together with Ranger Matte Mutli Medium. I accented the Panda with a white gel pen some Wink of Stella, and did some light shading with Antique Linen Distress Oxide Ink. I made a 3.5" top folding note card and added some Doodlebug Cookies and Milk paper before adding the Panda with some 3M foam tape.
For my Fox card I cut the image out of Neenah Classic Crest 80lb cardstock and some old rust cardstock from Stampin' Up!. I glued my images together with Ranger Matte Mutli Medium. I accented the Fox with a white gel pen some Wink of Stella, and did some light shading with Antique Linen Distress Oxide Ink. I made a 3.5" top folding note card and added some Doodlebug Cookies and Milk paper before adding the Panda with some 3M foam tape.
For my Bunny card I cut the image out of Neenah Classic Crest 80lb cardstock, black cardstock, and some pink cardstock. I glued my images together with Ranger Matte Mutli Medium. I accented the Panda with a white gel pen some Wink of Stella, and did some light shading with Worn Lipstick Distress Oxide Ink. I made a 3.5" top folding note card and added some Doodlebug Cookies and Milk paper before adding the Panda with some 3M foam tape.
If you have any questions about how I made these or about the SVGs feel free to comment below. Now it's your turn, go forth and make some adorable creations with these critters. Thanks for stopping by, until next time keep on crafting!


0 comments:
Post a Comment