Copyright © My Little Corner of the World
Design by Dzignine
Showing posts with label Card. Show all posts
Wednesday, August 29, 2018

Shake It Up: Designer Creative Challenge

Hey there, welcome to my little corner of the world! I'm here today to share a card I made for Craftin Desert Divas Shake It Up Designer Creative Challenge.


I have to tell you, this challenge was kismet! I bought the Bright Horizons Stencil because the moment I saw it a card idea popped into my head. Ever have that happen? My hubby hates it, because it usually means I'm buying more crafting supplies. Anyways, I saw this stencil and I had an idea kicking around in my head, sketched it out, but didn't actually get around to making it. This poor stencil sat around just waiting to be used. Then this designer creative challenge came up and I knew that it would only take a small change to make my card into a shaker.

I started by cutting my card base from some Strathmore Bristol Smooth. I next cut out a panel that was about 1/8" of an inch smaller than the largest die in the Inside Scalloped Rectangle Dies and set it aside. Next I pulled out some patterned paper from my stash and traced the sun portion of the stencil from some bright yellow patterned paper that has cute little polka dots and cut out all the pieces. I did the same thing with the clouds, only I used a blue patterned paper that featured white stripes. The patterned paper that I picked had a sheet with these cute little hearts, so I cut a couple out just in case.

I then aligned my stencil on the smaller piece of Bristol Smooth and used it as a guide to glue down the sun and clouds. I then cut out the largest scalloped frame from the Inside Scalloped Rectangle Dies and glued a piece of acetate to the back of it. I doubled up some 3M foam on the back of the scalloped rectangle die and set it aside. Since the shaker portion is so big I wanted to make sure that even when not being shake you could see the some of the sequins. I accomplished this by just gluing some Mermaid Lagoon Sequins to various parts of my paper pieced sun and clouds. I then glued one of those hearts I had cut out and put a fair amount of sequins in the middle of my sheet so I could attach the front part of the shaker.I added everything to my card base, added my sentiment and VoilĂ !


Supplies
Paper: Strathmore Bristol Smooth, Scrapbook Paper
Ink: Versafine Onyx Black
Accessories: Bright Horizons Stencil, Inside Scalloped Rectangle Dies, Mermaid Lagoon Sequins, Ranger Multi Medium Matte Adhesive

Until next time, keep on crafting!


Thursday, August 23, 2018

Obsessed with Distress Oxides

Hello Divas! Welcome to my little corner of the world. I'm here today participating in Craftin Desert Divas Obsessed with Distress Oxides Designer Creative Challenge.

I'm sure I can't be the only one who is utterly OBSESSED with Distress Oxide Inks? I mean seriously they go on so easily, especially if you're using watercolor paper or bristol smooth paper. I love how they react to water and recently I've enjoyed the look of Dr. Ph. Martin's Iridescent Silver sprinkled over the top.

For today's project I decided to use my favorite color combo for Distress Oxide Inks Antique Linen, Tattered Rose, and Worn Lipstick; I feel it looks like a romantic sunset.


I pulled out some Strathmore Bristol Smooth cut to 4" x 5.25" and started by blending Antique Linen on the bottom third of the panel (vertically). I next started blending tattered rose on the next third of the panel, taking care to blend between the Antique Linen and Tattered Rose, and then moved on to blending some Worn Lipstick on the top portion of my panel. I splattered my beloved Dr. Ph. Martin's Iridescent Silver and set my panel aside to dry. I pulled out my Puffy Cloud Die and cut a few out for the background and then colored the My Tweetheart Digi Stamp and accented with some white gel pen.

I mounted my panel onto a card base made of Neenah Solar White 110lb. paper. I glued down my clouds and added some of Craftin Desert Divas Sweetness Sequins mix. I finished off my card by popping my image onto an action wobble, using some Wink of Stella on my clouds, and adding my punny sentiment.


Supplies:
Stamps: My Tweetheart Digi Stamp
Paper: Strathmore Bristol Smooth, Neenah Soloar White 110lb.,
Ink: Distress Oxide Ink: Antique Linen, Tattered Rose, Worn Lipstick
Accessories: Puffy Cloud Die, Sweetness Sequins, Wink of Stella


I love how this card turned out and it was so much fun to make! It's your turn now, go forth and play with Distress Oxides. If you're already a fan leave a comment with your favorite color combo!

Until next time, keep on crafting!

Thursday, July 19, 2018

Let's Get Coloring

Hey guys welcome to my little corner of the world! Today I am participating in Craftin Desert Divas Let's Get Coloring Designer Creative Challenge.

Before I get to the challenge can we chat? Look I'm not trying to be dramatic, regardless of what my hubby says about me, but I thought I would warn you that today's card is inspired by true events. You know like in the movies.


I spent my weekend sick with what has to be the WORST summer cold EVER. Okay maybe I can be a little dramatic, but my cold inspired my card!

I spent a lit of time thinking about my go to items for adding color to my Digi Images. I'm a fan of most mediums, but today I grabbed for some of my alcohol markers. I think part of the reason I like alcohol markers so much is they make me look like more of an artist than I really am. You don't have to be an expert in using alcohol markers to give your images a little bit of depth. If you're just starting out two markers in the same color family can go a long way.  So that's what I did today; I grabbed two of each color in each of the color families I was using. I grabbed my Spectrum Noir markers and colored in my images and since I was using two colors per color family it took about 15 minutes to color in. I set my images aside and pulled out my Polygon Stencil from Craftin Desert Divas and got to work on my background. I tapped on some Distress Oxide Ink in Wild Honey, Spiced Marmalade, and Fired Brick. For good measure I used some of the Fired Brick with water and flicked over the front of my panel.

I layered my panel on some black cardstock, added that to my Lawn Fawn Chili Pepper card base, I glued the volcano and palm tree down flat to my card front. I then popped up the stegosaurus with some foam tape and finished it all off by adding some Lollipop Sequins and my cold medicine inspired sentiment.


 Products Used:
Stamps: Craftin Desert Divas Dino Stegosaurus Digital Stamp Set, Dino Triceratops Digital Stamp Set, and the Dino Tyrannosaurus Digital Stamp Set.
Paper: Lawn Fawn Chili Pepper Cardstock, Black Cardstock, Strathmore Bristol Smooth, and Neenah Classic Crest 80lb
Ink: White Gel Pen, Distress Oxide Ink in Wild Honey, Spiced Marmalade, and Fired Brick 
Accessories: Creftin Desert Divas Polygon Stencil and Lollipop Sequins.

I hope you enjoyed my addition to the Challenge. Now it's your turn to play along and post some of your art in the Craftin Desert Divas Gallery. If you're looking for some great Digi Stamps, don't forget you can sign up for Craftin Desert Divas Digi Stamp Club. For $7.00 a month you get $14.00 worth of Digi Credits.

Until next time, keep on crafting!
Thursday, July 5, 2018

BIRTHDAY CARD STASH - DESIGNER CREATIVE CHALLENGE

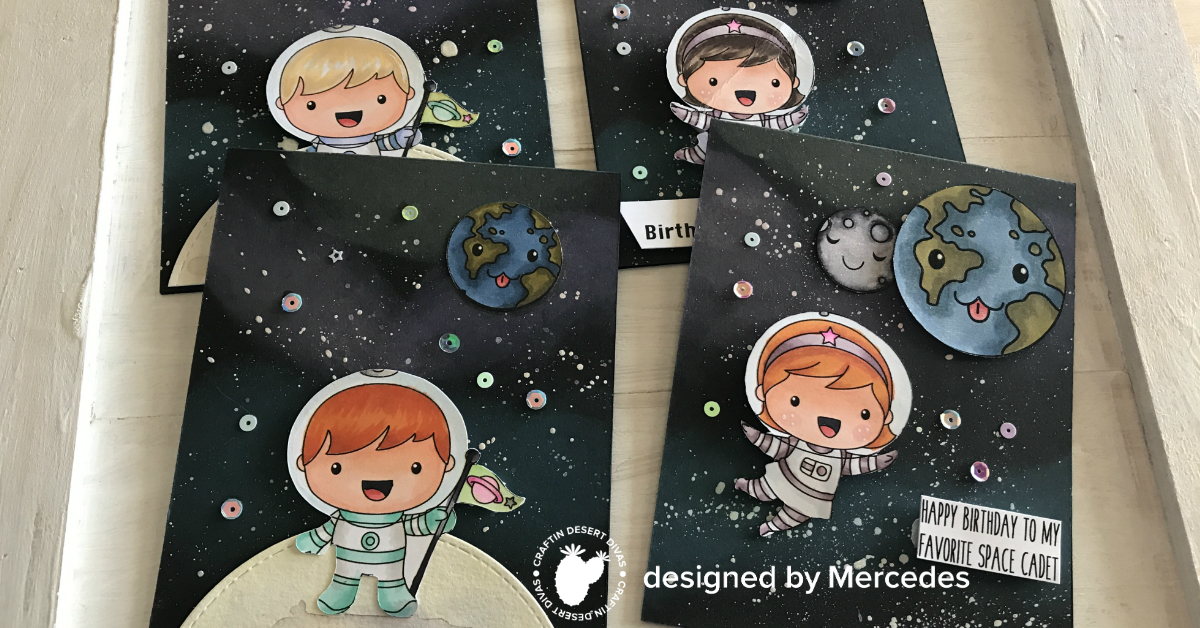
Hey guys! Welcome to my little corner of the world. Today I decided to join in on Craftin Desert Divas Birthday Card Stash Creative Challenge.


Even with as much crafting as I do, I always find I’m in need of birthday cards. Let’s be honest, you can never have too many. This time of year I have a slew of birthdays coming up for various family members so this was the perfect opportunity to add to my stash!


I thought I would share what I do to streamline my card making process when I’m making multiple cards. I am all about putting cards together assembly line style. I like to do everything in groups. For example I will color all my images, then cut them all out, work on all my backgrounds, add my images, and finally add my sentiments.


For today’s project I printed out all my images from Craftin Desert Divas Space Cadet digital set, grabbed a lap tray, and spent a little time multi-tasking, in which I mean I was watching a movie with the family while I colored away. I’ve had quite a busy week, so to save some time I started up my Brother Scan N Cut and let it cut out the images. I threw all my images in a little container then set to cutting up a couple sheets of black cardstock. I knew I wanted to do a Galaxy background for these cuties but that can be time consuming, so I opted for the quick and easy galaxy background. I used my black cardstock and added some Distress Oxide Ink for some color and splattered some white gouache and some Dr. Ph. Martin's Iridescent Silver Calligraphy Color for “stars”. Next I added the images that were going to be flat on the cards with some Multi Medium Matte and added the images that were going to be popped up with foam tape; then added my sentiments. Last but not least I finished off my cards with some Fairy Dust and Lollipop sequins.


Project Supplies
Stamps: Space Cadet Digital Set
Inks: Distress Oxide Inks in Twisted Citron, Picked Raspberry, Wilted Violet, Mermaid Lagoon for the background. For the “moon” that the cadets are standing on Antique Linen and Hickory Smoke.
Paint: White Gouache and Dr. Ph. Martin's Iridescent Silver Calligraphy Color
Adhesive: Multi Media Matte and Foam Tape
Accessories: Fairy Dust and Lollipop
I have to say that this was such a fun challenge and I got some much needed birthday cards out of it. Don't forget you can join Craftin Desert Divas Digi Stamp Club and get $14 worth of Digi Stamps for $7.

Until next time, keep on crafting!

Wednesday, May 16, 2018

Spring Color Palette Challenge

I recently discovered that Honey Bee Stamps has a Facebook Group called  Honey Bee Stamps Buzzworthy Challenges. I adore Honey Bee Stamps and so I decided to give it a go. The challenge that just ended yesterday was the Spring Color Palette Challenge.


Just look at those colors, they scream spring! I saw this color combo and had an idea pop into my head. I used the  Blah, Blah, Blah stamp set and stamped various phrases in Distress Oxide Inks matching the colors above. I then stamped a couple of images from Coffee Break onto some Canson watercolor paper and water colored them using my Distress Oxide Inks. 


I finished off the card by embossing that absolutely adorable phrase from Blah, Blah, Blah onto black card stock and adding some sequins. 

It was a blast getting back to crafting. 

Until next time, Keep on Crafting!


Tuesday, October 31, 2017

MFT Color Challenge #80

So I have been away, doing stuff, per usual. I have been crafting, just not posting. I thought I would post my entry into MFT's Color Challenge #80. This challenge inspired not just my entry but a Christmas card for a dear family friend. So here we go!


Last week there was a night where I could not sleep. You know where the harder you try to sleep the more frustrated you become? Yeah, like that. Anyway, since I couldn't sleep I was checking out MFT's Card Challenge site and noticed the color combo for this challenge. Very cute colors, but a little out of my norm. I was banging my dead trying to think what I wanted to do with them. My first flash of inspiration came not for what MFT card I would make, but the for a Christmas card for a family friend. I recently purchased Darcie's Stamps Happy Holla Days because I knew our family friend would LOVE Hipster Santa! I mean look, isn't he too cute for words?


So I got to work and made this card here. Please excuse my tilted pictures, I could not find my tripod and decided to free hand it. Yup that did not work. By the end of picture time I was frustrated and said to heck with it. 

I used one of my old There She Goes stamps sets for the background. I can't remember the name of it, but it's this one below: 

Anyway I used this set as the background and put dear Hipster Santa in the foreground. It's kind of hard to tell but I stamped the card base with MFT's Whimsical Woodgrain Background and layered some So Safron from my stash. I swear it looks cuter in person!

On to my submission for the MFT Color Challenge....

Again, I had camera/tripod issues so the colors are not coming out a vibrant as they are on the card. Just looking at the picture irks me.. I swear I when I get my tripod back I will update with a new photo!!


Alright, I know it wasn't much of an update or post, but I've been busy, busy, busy. 

Keep on Craftin'!


Wednesday, September 27, 2017

Never too soon for Halloween


It seems like every year goodies for certain holidays start showing up sooner and sooner. I know that this can make many people roll their eyes, but not me. I love the first signs of Halloween goods popping up in stores, because that means fall is upon us. This for me starts the most magical time of the year. We start with Halloween, all the adorable costumes, and all the spooky movies. So it should not come as any surprise that my cards for this week are Halloween themed.

I picked up MFT Stamps Witch Way Is The Candy by Birdie Brown a couple of years back and did nothing with it until this year. Honestly, I used to have a job where I was on call 24/7 so as much as I love crafting, I never have time for it. These days though I have a set schedule and much more time to do what I LOVE!

This week I made two Shaker Cards using Witch Way Is The Candy.

My first shaker was easy enough to make. I used Stampin' Up!'s Summer Sun Cardstock for the frame and base of the card because I thought it went really well with the patterned paper from my stash. I die cut some clouds out of white cardstock using Lawn Fawn's Puffy Clouds Border Die and inked it up with some black soot Distress Ink. I threw in some Doodlebug Sequins and BAM, shaker was done.

I didn't run into any issues until I went to color that precious witch. My hubby recently surprised me with a full core set of the Spectrum Noir alcohol markers. While they are similar to Copics, they don't blend quite the same as Copics do. There's definitely a learning curve to them, but they are great markers and a truly sweet gift from a fantastic hubby!


My second card using that cutie put up a little more of a fight.I knew I wanted to put a shaker tag onto a card front and started working on the tag first. My first tag ended in Utter Disaster. I am not saying this to be dramatic, my first tag warped, my sequins fell out due to the warping, it was not pretty. The only thing I managed to salvage from that first tag was the sequins.

Creating my second tag went much smoother than the first. The sentiment is embossed onto black card stock and comes from the HSH Halloween Additions set by  There She Goes. I used some patterned paper from my stash for the background of the tag and sponged some Spiced Marmalade Distress Oxide Ink onto some white paper and die cut it out for the top of my tag. I finished the tag off with some Lawn Fawn Gold Sparkle Cord, black ribbon, and some gold Pretty Pink Posh sequins.

My tag ended up just a little bigger than I originally intended so I made a 5x7 card base out of Canson watercolor paper. I used my Kuretake Gansai Tambi to watercolor the base with black and gold and put it all together.


My question to y'all is, are excited to see Halloween stuff already or do you wish they would wait until closer to the actual holiday?

Until next time, keep on craftin'!

Thursday, September 7, 2017

Cards make the best gifts

My favorite Aunt in the whole world hates when people spend money on her. She would rather people save their money and just spend time with her. She is the sweetest lady you could ever know. She also happens to love my cards, so every year I make a stack of cards to give to her for her birthday. She absolutely loves this because she gets to give handmade cards to friends and family throughout the year. I thought I would share my last batch I did.


I wanted to make a little bit of everything for her. Since I try and make multiples of a card when I sit to do my crafting, I was also able to throw in some of my duplicates.

Let's start with the newer cards:

I love to buy patterned paper. It is always so adorable, but half the time I am not sure what to do with it. I am working on using more of my stash, so you will see quite a bit of patterned paper used here!

This first card happened by accident. I love this pattern paper, which I have no idea where I got it from. I found that Stampin' Up!'s Pink Passion, Basic Gray, and Summer Sun worked well the pattern.


(Papertrey Ink: Butterfly Die)


(Lawn Fawn: So Jelly Stamp and Die Set)


(Papertrey Ink: Out to Sea Stamp Set)

(Lawn Fawn: Baked With Love Stamp and Die Set)


(The Greeting Farm: Roll Call Wild Sprouts Stamp Set)


(Stampin' Up!: Well Scripted Stamp Set)

(Stampin' Up!: Well Scripted Stamp Set)

(Papertrey Ink: Fillable Frames #8 Mini Stamp Set and Die)


All the cards above were boxed up with envelopes in the box below. The bow was made with my We R Memory Keepers Envelope Punch Board.


Thanks for stopping by and don't forget to keep crafting!!