Copyright © My Little Corner of the World
Design by Dzignine
Showing posts with label Crafting. Show all posts
Friday, November 10, 2017

Quick Candy Holders

I have spent most of this week prepping a "stamp camp" for my wonderful Mother in Law, my fantastic Aunt in Law and their friends. I am helping them with Christmas cards, which I will be sharing once this weekend is over. In the mean time I have two super quick candy holders I made for friends to share with you!


My first project is a little box made from a sheet of my Fancy Pants Designs,  Etcetera Collection - 6 x 6 Paper Pad. I stamped out the little pig from MFT's Whole Herd stamp set onto some Strathmore Bristol Smooth and colored it in using my Spectrum Noir pens and my white gel pen. I fussy cut the little oinker and used my ATG gun to glue him to the front of my box. I filled the box with Hershey's kisses, closed it up then stamped the sentiment on a scrap piece of Strathmore Bristol Smooth and outlined it in a color that matched my paper. I finished it off with some hemp twine and some old Stampin' Up! lacey ribbon I had hanging around.

I found the instructions for the box at Pootles Blog HERE


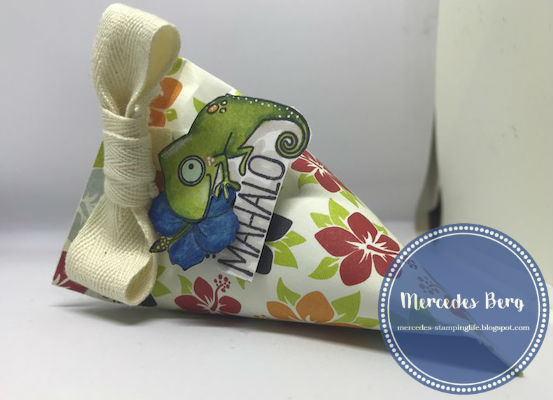
My second candy holder is an old school "Sour Cream Container". I know it's called that because they used to do smaller sour cream portions in little pouches that had the same shape. As for me I remember the shape from Minute Made Juice Bars.. You know these ones: 


Anyway, these are super easy to make and can be dressed up in just about any theme! You can find directions on how to make them HERE.

I used some cute Hibiscus patterned paper I had hanging around and cut it to 5.5 x 4.25 inches. I filled the container with salt water taffy and then got to work on embellishments. I stamped out my favorite chameleon and that cute Hibiscus flower from BB Polynesian Paradise - MFT Stamps onto Strathmore Bristol Smooth paper and colored with my Spectrum Noir markers. I then took some Stampin' Up! twill ribbon and made a bow to add at the top. Honestly it took more time to color the chameleon than to put the whole thing together! 

Until next time Keep on Crating

Tuesday, July 18, 2017

Kickin' It

I think one of the reasons I am so drawn to My Favorite Things Stamps is their use of puns. I admit it, I'm a punny gal! Who doesn't love a good chuckle? And let's face it their stamps are FREAKING ADORABLE; I feel like Agnes from Despicable Me. IT'S SO FLUFFY!!!!


So this past weekend, between hair cuts, movies, cooking, and guests, I found time to work on a card that I have been wanting to make; I was inspired by Laura Bassen and Amy Rysavy.

Anyway I decided to use MFT Stamps Ninja-mazing stamp and die sets for my slider card.


I stamped my images on Strathmore Bristol Smooth Paper with Archival Black Ink and my Mini MISTI. As a side note can we talk about how much easier the MISTI makes life for stampers? I can't tell you how many times I would have to start over on a project because I could not get a clear image stamped. Anyways... 


I used my Zig Clean Color markers, along with my Pentel Aquash Waterbrush to color my images. Again, how cute are these stamps? 


I used my Cuttlebug and the matching dies to cut these out. I have to say I was pretty pleased with my results (except for that throwing star). 


And of course in usual Mercedes fashion, I forgot to take pictures of the other stuff I die cut. I used Lawn Fawn's Grassy Boarder Die, Impression Obsession's Cloud Dies, and a lovely set of really inexpensive round stitched dies (like $6). I have to say I was hesitant to buy the circle dies, but ended up being pleasantly surprised by them. 


I then missed taking pictures of all the important steps, you know like where I used my Exacto Knife to cut out the slider area on the back piece of grass. 

I used a piece of pattern paper for the back drop and some green textured paper for the grass. I laid out my scene and then added a piece of acetate to the back of my Ninja so he would be above the grass. 


My finished card with the slider still inside. 


My slider card with the slider pulled out. 


And last but not least, I used my remaining pieces to make a cute little scene on the inside of the card along with the sentiment Let's kick it soon (told you I love the puns). 

I promise next time I will do my best to remember to take pictures of all the steps. 

Now go forth and craft!