Copyright © My Little Corner of the World
Design by Dzignine
Showing posts with label Card Making. Show all posts
Thursday, July 19, 2018

Let's Get Coloring

Hey guys welcome to my little corner of the world! Today I am participating in Craftin Desert Divas Let's Get Coloring Designer Creative Challenge.

Before I get to the challenge can we chat? Look I'm not trying to be dramatic, regardless of what my hubby says about me, but I thought I would warn you that today's card is inspired by true events. You know like in the movies.


I spent my weekend sick with what has to be the WORST summer cold EVER. Okay maybe I can be a little dramatic, but my cold inspired my card!

I spent a lit of time thinking about my go to items for adding color to my Digi Images. I'm a fan of most mediums, but today I grabbed for some of my alcohol markers. I think part of the reason I like alcohol markers so much is they make me look like more of an artist than I really am. You don't have to be an expert in using alcohol markers to give your images a little bit of depth. If you're just starting out two markers in the same color family can go a long way.  So that's what I did today; I grabbed two of each color in each of the color families I was using. I grabbed my Spectrum Noir markers and colored in my images and since I was using two colors per color family it took about 15 minutes to color in. I set my images aside and pulled out my Polygon Stencil from Craftin Desert Divas and got to work on my background. I tapped on some Distress Oxide Ink in Wild Honey, Spiced Marmalade, and Fired Brick. For good measure I used some of the Fired Brick with water and flicked over the front of my panel.

I layered my panel on some black cardstock, added that to my Lawn Fawn Chili Pepper card base, I glued the volcano and palm tree down flat to my card front. I then popped up the stegosaurus with some foam tape and finished it all off by adding some Lollipop Sequins and my cold medicine inspired sentiment.


 Products Used:
Stamps: Craftin Desert Divas Dino Stegosaurus Digital Stamp Set, Dino Triceratops Digital Stamp Set, and the Dino Tyrannosaurus Digital Stamp Set.
Paper: Lawn Fawn Chili Pepper Cardstock, Black Cardstock, Strathmore Bristol Smooth, and Neenah Classic Crest 80lb
Ink: White Gel Pen, Distress Oxide Ink in Wild Honey, Spiced Marmalade, and Fired Brick 
Accessories: Creftin Desert Divas Polygon Stencil and Lollipop Sequins.

I hope you enjoyed my addition to the Challenge. Now it's your turn to play along and post some of your art in the Craftin Desert Divas Gallery. If you're looking for some great Digi Stamps, don't forget you can sign up for Craftin Desert Divas Digi Stamp Club. For $7.00 a month you get $14.00 worth of Digi Credits.

Until next time, keep on crafting!

Thursday, October 12, 2017

Whale, hello there...

Good morning! Did you all craft your hearts out this weekend for World Card Making Day? If you did, I am jealous. I 100% spaced it. I made other plans that day not remembering what it was. I was curious as to why my Facebook feed was filled with extra cards made by lovely people in groups I follow. Then it hit me.... BAM! How can I not be crafting on World Card Making Day? Don't get me wrong I got to spend time with my family, but I am still kicking myself.

I did eventually get around to making a couple of cards to share.

I love this card because it was super quick and easy. The only bummer is that I did not use my MISTI or Tim Holtz Platform and ended up with a little uneven coverage. She's still a beauty!

Stamps: Whale Wishes Mini Stamp Set
Inks: Memento Paris Dusk, Memento Rhubarb Stalk
Paper: Kraft Cardstock, Neenah Crest Solar White (80#), Patterned paper of unknown origin (makes it sound mystical, no?)
Accessories: Red Grosgrain Ribbon,  Whale Wishes die


 My second card I made took a bit longer than I anticipated. The first one I made did not turn out the way I wanted it to. I felt like something was missing. This is when I decided to stamp several images in Distress Oxide Ink (Worn Lipstick) and put a piece of vellum over that. That pulled it together for me.

Stamps: Lawn Fawn Baked With Love
Inks: Archival Black, Distress Oxide Ink (Worn Lipstick), Zig Clean Color Real Brush Pens
Paper: Kraft Cardstock, We R Memory Keepers Clearly Bold Acetate, Vellum, Bristol Smooth
Accessories: Die-namics Stitched Square STAX, Lawn Fawn Baked With Love dies


I would love to see what you all worked on for World Card Making Day. If you are willing to share, leave a link in the comment section!

Until next time, Keep on Craftin'!


Friday, October 6, 2017

Spook-tacular Cards and Podcasts

I know you are probably tired of hearing about it by now, but it was yet again another frantic week. Now before you roll your eyes and say Mercedes, isn't that always your excuse? And while it often is, this week it is for a fantastic reason; I recorded my very first podcast! I have to tell you I was terrified when I sat down to record with Billiam of SomewhatNerdy.com, Big D, and A.J., but after a few minutes with the group I was totally at ease. The podcast is going to be the Greatest Of All Time List, or the GOAT List. This podcast is going to be a bi-weekly podcast where myself and my fellow pod casters sit and talk about why a particular movie is the Greatest Of All Time... Except the movie isn't the greatest, not even close. We'll discuss all the cheesy goodness in our favorite B List Movies and then talk about why we love it and why it made our list. The first episode won't be up for a week or so, but when it is I will post a link for those of you who are interested in listening.


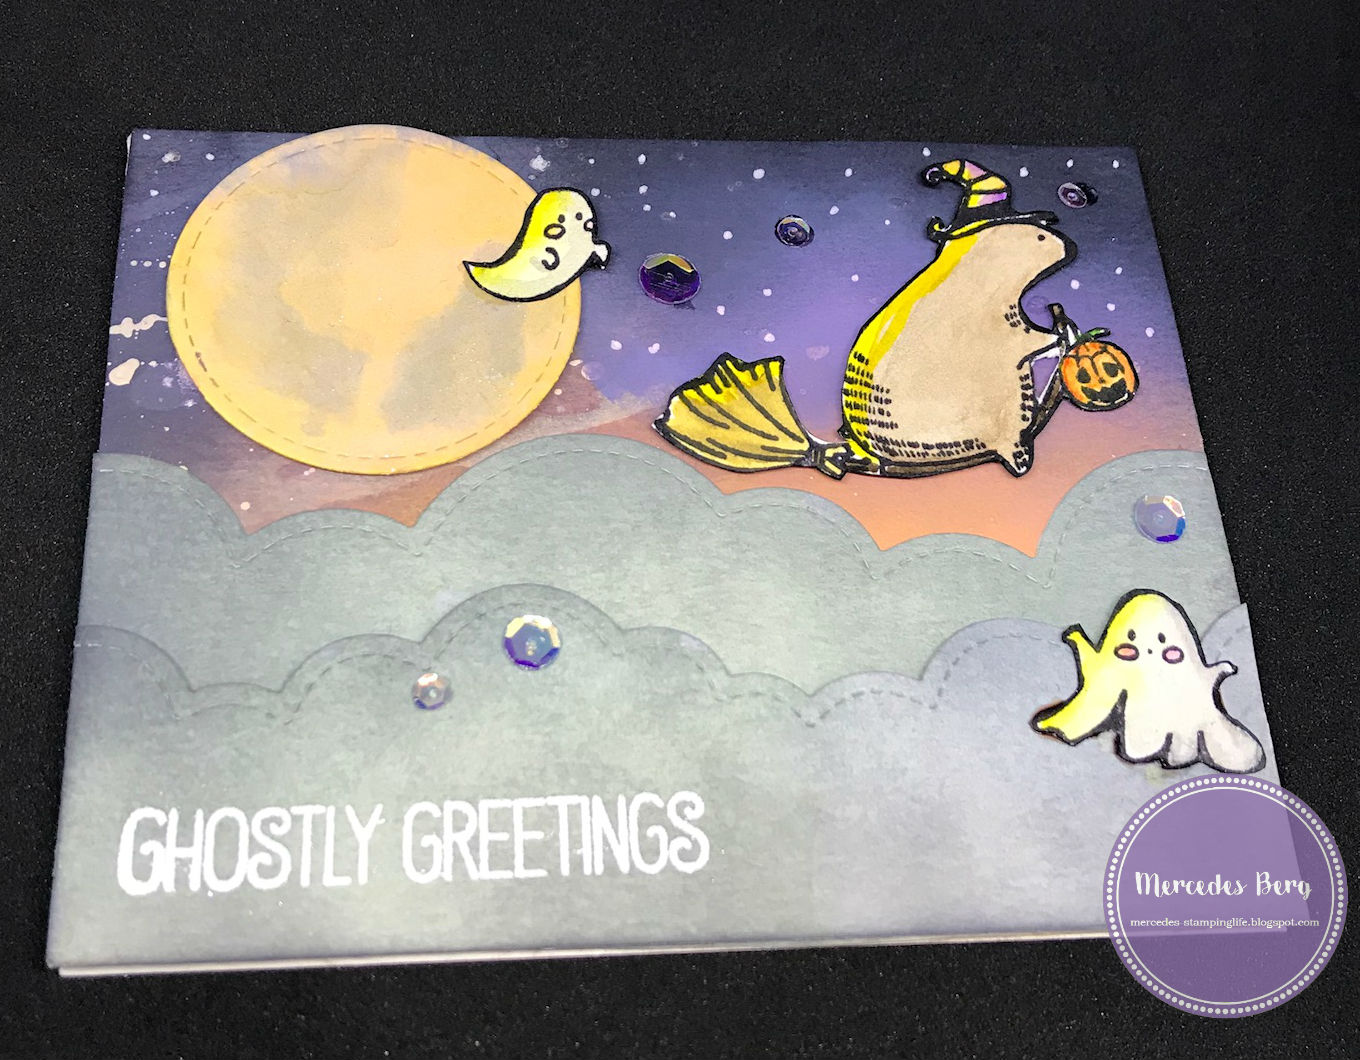
Now on to what you really came here for... The cards! I'm back again, with another Halloween card combo. This week I decided to use the same stamp sets and basic design idea to make two different cards.

Stamp Sets Used: BOO - by Waffle Flower Crafts, Fab-BOO-lous Friends by My Favorite Things
Paper: Canson Watercolor Paper, Stampin' Up! Basic Grey, Lawn Fawn Polka in the Dark
Ink: Archival Black, Kuretake Gansai Tambi Watercolors, Oxide Distress Inks (Black Soot, Faded Jeans, Wilted Violet, Spiced Marmalade, Fossilized Amber, and Iced Spruce), VersaMark, Spectrum Noir Glitter Marker, and Sakura White Gelly Roll
Accessories: Lawn Fawn Scalloped Box card pop-up dies, Lawn Fawn Puffy Cloud border die, Die-namics Stitched Sentiment Strips, Die-namics Stitched Circle Stax, Detail White Embossing Powder, and Neat & Tangled Like Magic Sequins


These two cards all started with the idea that I wanted to use my Distress Oxide Inks to creat a spooky twilight (time of night, not the movie) background and see if it would work in different sizes.

I started by blending my inks lightest to darkest on my watercolor paper (sizes: 4 1/4" x 5 1/2" and 3 1/4" x 2 1/4"). My smaller piece was run through my Cuttlebug with one of the panel dies from my Lawn Fawn Scalloped Box card pop-up dies and the larger piece was left as is. I now had two almost identical backgrounds in two different sizes. I then stamped, watercolored, and fussy cut out my images from the Boo Stamp Set. I set everything aside and ran the Lawn Fawn Scalloped Box card pop-up dies through my Cuttlebug with Stampin' Up! Basic Grey cardstock; then I got to work assembling my pop up box card.

Once I put my box card together I embellished with some Neat & Tangles Like Magic sequins, embossed the sentiment from Fab-BOO-lous Friends by My Favorite Things and voilĂ . I love the way the box card came out and am popping it in the mail this week to a really great friend.

As a side note, I bought a new light box to test out since I wasn't happy with my pictures. These are a little better, but I am still figuring it out so please be patient with me! 


If you remember from like a paragraph ago that I wanted to use the same background, just in two different sizes, so my second panel was attached to a card base and I built up from there. They layout is almost identical except the position of the ghosts. I embossed my greeting using a sentiment from Fab-BOO-lous Friends by My Favorite Things. 


I don't normally do "Halloween" cards, but I have just loved the sets that have been coming out so I have had to change my stance. What about you all? Do you make Halloween cards or do you use your Halloween stamps for something else? Let me know!

Overall I have to say that my little experiment worked out and I love, love, love how these cards make me feel like Halloween is here. 

That's all I have for now. If you're at all interested in know when the podcast gets published leave a comment!

Until next time Keep on Craftin'


Monday, August 21, 2017

Mistakes

The hubby and I recently babysat our niece and nephew over night. Once we put the kids to bed, I pulled out my iPad to continue my Clean and Simple Card Making Class by Jennifer McGuire and Kristina Werner. My niece couldn't sleep so I let her snuggle next to me while I was watching one of the videos. My niece was absolutely adorable; she had several questions about card making. In the end, I got her to finally go to bed by promising to make her a card with a rainbow. 

I sat down this weekend to work on her card and struggled quite a bit. I'm not sure about any of you, but there seem to be days when I am crafting and nothing seems to work out right. My ink smeared, I grabbed the wrong ink for the medium I was working with, and on and on the list went. I was frustrated but determined to make the best of a bad situation. In the end I was able to make something that I think is rather charming and magical. I'm hoping my niece will love it as much as I do. 

I started by smooshing (this is a real word, I swear) some Memento Ink  onto a clear acrylic block.


(Colors: Lady Bug, Tangelo, Dandelion, Pear Tart, Bahama Blue, and Lilac Posies)

I brushed on a thin layer of water and started to paint on each of the colors to achieve a rainbow background. 

I loaded up my "Palette" again and started to watercolor my Magical Unicorn images by MFT Stamps. 

While I has some issues on the rainbow, I loved the way the rest of the images came out. 


 (See I told you that rainbow game me problems)

I then took that rainbow background I and ran it through my Cuttlebug using Darice's Cloud Background Embossing Folder.


I cut down my background to 4 x 5.5 and then stapled my sentiment using  Tim Holtz's Tiny Attacher. I next affixed it to the front of So Saffron Card Base. I die cut out my images, stamped my sentiment onto Neenah Solar White, and put it all together. I felt like it still needed a little something so I added some iridescent sequins that I added some Ranger Stickles. 

So here it is my final project... 

Until next time!


Monday, July 24, 2017

Stranger Crafting

Today's post doesn't really have a lot of stamping involved, but there was a lot of crafting going on. This week is my husband's birthday and I had been procrastinating on his birthday card. I was struggling with what theme I would use and what I would do with it. The hubby and I are NERDS, as in married on the bridge of the Starship Enterprise NERDS; I have made him Star Trek cards, Zombie cards, and Star Wars cards. The hubby has a lot of interest, which you think would make it easy to pick something. I was really starting to get anxious that inspiration would never hit.

THEN BAM! 
Please note there may be minor SPOILERS ahead so proceed at your own risk.

Photo Credit: {Netflix}
As with all things in life, the hubby and I were late to the Stranger Things fandom, but we've dived right in.  

The hubby has also recently taken a shine to breaking out the old VHS player and watching movies on VHS; he's nostalgic. I decided to make him a Stranger Things card in a box using an adorable set of Stranger Things clip art I purchased on Etsy.  Now if you have never seen what a card in a box looks like, they are a pop up card that is meant to fold down flat to fit into an envelope. One side of the box stays up while the other three sides are bent down. Like this:

Photo Credit: {Splitcoaststampers.com}


I had this idea in my head that I wanted the outside and back of the box to look a little like Joyce Byers' living room. So, remember earlier when I said that there wasn't a lot of stamping, the only thing I stamped was both the inside and outside of the card in a box with a wood grain background. I then did some Google searching for something akin to her wallpaper and those lights. You know the ones I am talking about.

Photo Credit: {Netflix}
I also wanted the three flaps that are bent down to represent The Upside Down.

Photo Credit: {Netflix}


This is what I came up with after some light stamping, printing, fussy cutting, and gluing. 


I have to say that I loved the way it turned out, but I felt like doing just a Stranger Things card was not enough. I decided I wanted to do a snack pack with some of the hubby's favorite goodies. Since I was already doing the Stranger Things theme, I figured I would use an old/empty VHS case. I did some more Googling and found a couple of VHS covers, printed, and trimmed them to size. It wasn't until I was loading my pictures though that I noticed a LARGE typo on the back of the insert. Overall though it is adorable. I love the idea of giving small gifts or snacks in unusual containers. 


That's all I have for today. Next week we'll be back to stamping! 


Tuesday, July 18, 2017

Kickin' It

I think one of the reasons I am so drawn to My Favorite Things Stamps is their use of puns. I admit it, I'm a punny gal! Who doesn't love a good chuckle? And let's face it their stamps are FREAKING ADORABLE; I feel like Agnes from Despicable Me. IT'S SO FLUFFY!!!!


So this past weekend, between hair cuts, movies, cooking, and guests, I found time to work on a card that I have been wanting to make; I was inspired by Laura Bassen and Amy Rysavy.

Anyway I decided to use MFT Stamps Ninja-mazing stamp and die sets for my slider card.


I stamped my images on Strathmore Bristol Smooth Paper with Archival Black Ink and my Mini MISTI. As a side note can we talk about how much easier the MISTI makes life for stampers? I can't tell you how many times I would have to start over on a project because I could not get a clear image stamped. Anyways... 


I used my Zig Clean Color markers, along with my Pentel Aquash Waterbrush to color my images. Again, how cute are these stamps? 


I used my Cuttlebug and the matching dies to cut these out. I have to say I was pretty pleased with my results (except for that throwing star). 


And of course in usual Mercedes fashion, I forgot to take pictures of the other stuff I die cut. I used Lawn Fawn's Grassy Boarder Die, Impression Obsession's Cloud Dies, and a lovely set of really inexpensive round stitched dies (like $6). I have to say I was hesitant to buy the circle dies, but ended up being pleasantly surprised by them. 


I then missed taking pictures of all the important steps, you know like where I used my Exacto Knife to cut out the slider area on the back piece of grass. 

I used a piece of pattern paper for the back drop and some green textured paper for the grass. I laid out my scene and then added a piece of acetate to the back of my Ninja so he would be above the grass. 


My finished card with the slider still inside. 


My slider card with the slider pulled out. 


And last but not least, I used my remaining pieces to make a cute little scene on the inside of the card along with the sentiment Let's kick it soon (told you I love the puns). 

I promise next time I will do my best to remember to take pictures of all the steps. 

Now go forth and craft!


Wednesday, July 12, 2017

Scratch and Sniff Card

Earlier this year Inky Antics released a set of clear scratch and sniff stickers in Chocolate, Peanut Butter, Honey, Banana, Popcorn, and Pizza. 


These stickers had me feeling all kinds of nostalgic. I remember collecting all the different scratch and sniff stickers. Do you remember them? Which was your favorite?


I decided to pick up a couple of packs of Inky Antics stickers. They come in a pack of 20 on perforated little squares. I broke out the pizza scented ones this weekend to try out. I thought it worked really well with Simon Says Stamps: Funny Food.


I used Kraft card stock for my base and then die cut a 2.5" circle out of 110lb. card stock and stamped out that cute slice of pizza with his punny sentiment "You've got a pizza my heart". I added a few hearts that I punched out and put
the clear scratch and sniff sticker over the pizza slice.


I finished off the card by cutting a fish tail into a piece of black card stock and using foam pop ups to secure it all on to the card. 


I have to say I absolutely LOVE these stickers; I can't wait to try them all out. 

Have you tried them yet? What are your thoughts?